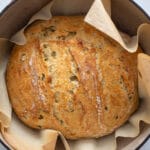
Green Chili Cheese Bread
This no-knead bread is a whole wheat bread loaded with the delicious flavors of monterrey cheese and green chilis! It is simple to make and so delicious!
Servings: 14
Equipment
- dutch oven
- medium-sized bowl
Ingredients
- 2 cups whole wheat flour
- 2 cups all-purpose flour
- 2 teaspoons salt
- 2 teaspoons cumin
- ¾ teaspoon active dry yeast
- 1 teaspoon ground black pepper
- 2 cups room temperature water
- 1 ½ cups Monterrey cheese or you can use cheddar
- 1 4 ounce can green chilis they range from mild to hot, so choose what you like.
Instructions
- Make sure and read instructions all the way through before starting.
- Add the dry ingredients to your medium-sized bow. Mix. Next, add in the wet ingredients. Don't worry about draining the green chilis. I use the juice too.
- Mix for about a minute to make sure the ingredients are well incorporated. Cover with saran wrap and leave it at room temperature for 10-18 hours. I made mine in the evening, then baked the following morning.
- When you are ready to bake, place your dutch oven in the oven and heat it at 475 for 30-45 minutes. You want the oven and the dutch oven to be really hot when you add the bread.
- Once it is heated, it is time to form the bread. Flour your surface generously, then pull out the bread dough onto the surface.
- Gently roll it into a ball. Yes, it is really sticky. You can check the video in the post to see how a shaped it. Once it is shaped, place it on a piece of parchment paper. If you want, you can score the loaf as I did.
- Gently pick up the sides of the parchment paper and move it to the hot dutch oven. Put the lid back on the dutch oven and move to the hot oven.
- Bake for 30 minutes with the lid on, then remove the lid and bake for another 10-15 minutes. You want the bread to be a beautiful golden brown on top.
- Remove the dutch oven from the oven, then carefully lift the parchment out to get the loaf from the dutch oven.
- Place it on a cooling rack. I recommend letting it cool for at least 30 minutes. This will help the inside to set before you slice it!
Video
Notes
- Make sure and mix the dough well before covering. You don't have to knead it, but make sure it is mixed well. It took me 1-2 minutes to get mine mixed in like it should be.
- There are a lot of great whole-grain flours out there, try one you haven't tried yet! Just make sure it is a high-protein flour. Rye, kamut, einkorn, red winter wheat, etc. all work well.
- For baking, it is really important to follow the steps listed above. Make sure and preheat the dutch oven. You want the dough to go into a hot vessel. This will create the steam that is needed for that beautiful rise. Do not skip this step. "When unbaked dough, with all its interior moisture, is put inside the hot pot, precious humidity is captured in the form of steam. The steam keeps the crust soft longer, so it can continue to expand during the early stages of baking. The result is a lofty loaf that looks like it came from the bakery down the street!" This is from King Arthur Baking.
- I like to let my bread cool before slicing. If not, you will notice it is a little gummy in the center. As the bread cools, the starches in the bread will return to a solid state and one most of us are looking for.